DIY Concrete Floor Resurfacing Without Hiring a Contractor
Reading time: 14 minutes
You’ve stared at that cracked, stained, or just plain ugly concrete floor long enough. Maybe it’s your garage, your basement, your patio, or even a room you’re converting into a livable space. The contractor quotes? Somewhere between “ouch” and “absolutely not.” In 2026, the average professional concrete resurfacing job runs between $3 and $10 per square foot—meaning a modest 500-square-foot garage floor could cost you anywhere from $1,500 to $5,000 before you’ve even chosen a finish color.
Here’s the honest truth: resurfacing concrete yourself is entirely achievable. It requires patience, the right materials, and a clear roadmap—not a contractor’s license. Thousands of homeowners every year take this project on and walk away with floors that look professionally done, at a fraction of the cost.
This guide is your step-by-step companion through the entire process—from assessing your floor’s condition to applying that final satisfying topcoat. Let’s turn a frustrating problem into a genuine home improvement win.
Table of Contents
- Assessing Your Concrete Floor’s Condition
- Tools and Materials You’ll Actually Need
- Surface Preparation: The Step Most DIYers Skip
- Choosing the Right Resurfacing Method
- Application: Step-by-Step Walkthrough
- Common Challenges and How to Overcome Them
- Cost Comparison: DIY vs. Professional
- Frequently Asked Questions
- Your Concrete Floor Transformation Roadmap
Assessing Your Concrete Floor’s Condition
Before you spend a single dollar on materials, you need to be brutally honest about what you’re working with. Not all concrete floors are candidates for DIY resurfacing, and skipping this diagnostic step is the number-one reason projects fail.
What Can Be Resurfaced vs. What Can’t
Concrete resurfacing is essentially applying a thin bonding overlay on top of existing concrete. For that overlay to stick and last, the substrate beneath it needs to be structurally sound. Think of it like plastering over a wall—if the wall is crumbling, no amount of plaster will save it.
Good candidates for DIY resurfacing:
- Floors with surface cracks smaller than 1/8 inch wide
- Concrete with minor pitting, scaling, or spalling
- Surfaces with cosmetic stains or discoloration
- Floors that are structurally solid but aesthetically worn
- Surfaces with minor unevenness (up to about 1/4 inch)
Floors that need professional intervention first:
- Cracks wider than 1/4 inch or with vertical displacement (one side higher than the other)
- Heaving caused by tree roots or frost movement
- Active water seepage from below
- Large areas of delamination or hollow-sounding sections
- Oil-saturated concrete (especially in older garages)
The Tap Test: Grab a hammer or a coin and tap across your floor in a grid pattern. A solid thud means good adhesion. A hollow, drumlike sound means the surface layer has separated from the base—resurfacing over hollow spots will simply peel away within months.
Moisture: The Hidden Enemy
In 2026, moisture-related resurfacing failures account for an estimated 40% of DIY concrete coating delaminations, according to the Portland Cement Association’s most recent homeowner guidance updates. Concrete is porous, and if moisture is wicking up from the ground below, any overlay you apply will eventually bubble, peel, or lift.
The Plastic Sheet Test: Tape a 24×24 inch piece of clear plastic sheeting to your floor, sealing all four edges with duct tape. Leave it for 24–48 hours. If you see condensation on the underside of the plastic, you have a moisture problem that needs addressing with a concrete sealer or vapor barrier before you resurface.
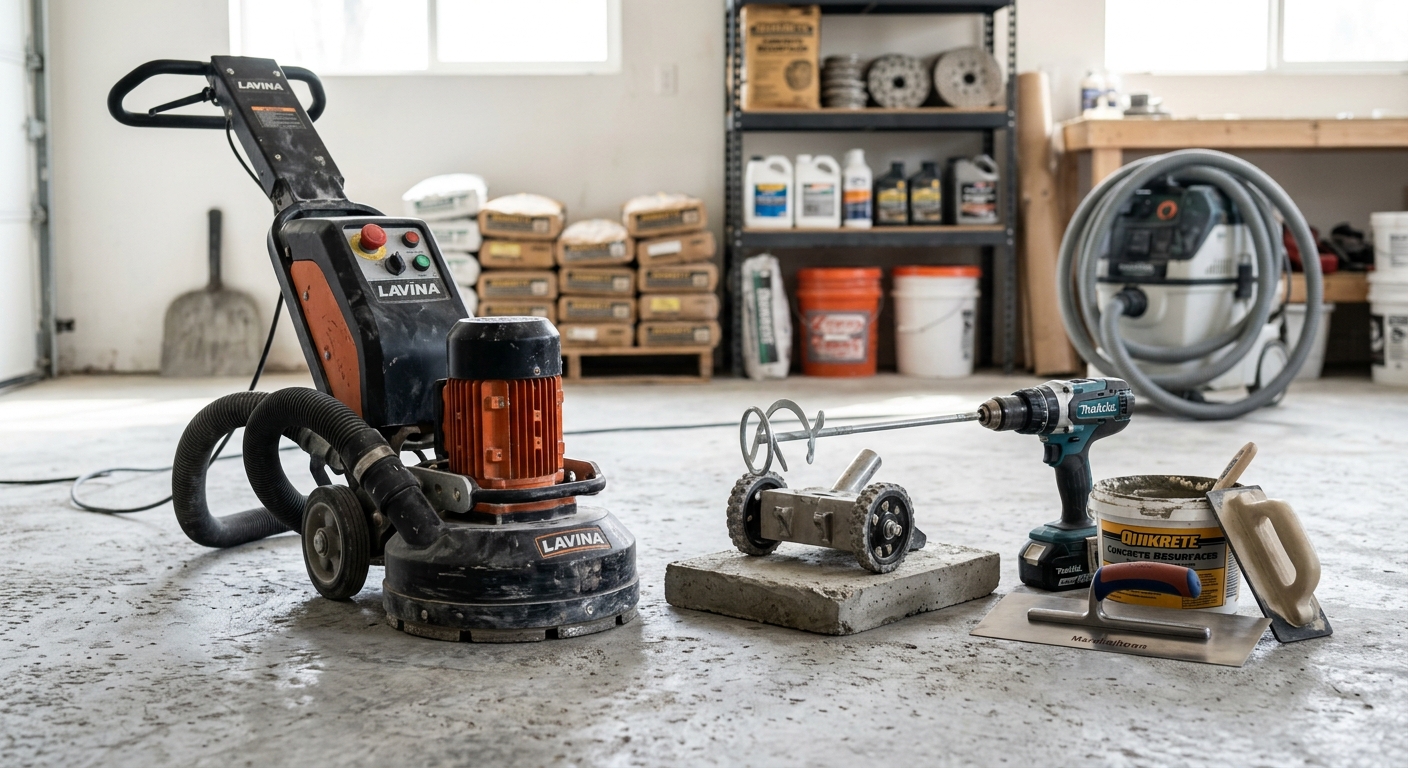
Tools and Materials You’ll Actually Need
One of the most common mistakes DIYers make is either over-buying products they don’t need or under-estimating what’s required for proper prep. Here’s a realistic breakdown.
Essential Tools
- Pressure washer (minimum 3,000 PSI for outdoor surfaces; a rental runs about $60–$90/day in 2026)
- Floor grinder or shot blaster (rental: $80–$150/day—critical for serious prep work)
- Diamond grinding discs (various grits: 30-grit for heavy profiling, 80-grit for finishing)
- Concrete crack filler (polyurethane or epoxy-based)
- Squeegee with long handle (at least 24 inches wide)
- Gauge rake (for spreading self-leveling overlays)
- Spiked roller shoes (for walking through wet coatings without leaving footprints)
- Bucket, mixing paddle, and drill
- Painter’s tape and plastic sheeting for edging protection
- Safety gear: N95 respirator, safety glasses, knee pads, chemical-resistant gloves
Material Options by Project Type
The resurfacing product you choose depends on your goal—cosmetic refresh, heavy-duty protection, or decorative finish. Popular 2026 options include:
- Concrete resurfacer (e.g., Quikrete Concrete Resurfacer): Best for patching and thin overlay work. Coverage: ~40–50 sq ft per 40-lb bag at 1/8 inch thick.
- Epoxy floor coating kits: Superior chemical resistance—ideal for garages. Brands like Rust-Oleum EpoxyShield and ArmorPoxy remain top-rated in 2026. Two-part systems outperform one-part significantly.
- Polyaspartic coatings: The professional’s choice gaining DIY traction. Faster cure time (walk-on in 2–4 hours), UV-stable, and exceptionally durable. Slightly more expensive but worth it for high-traffic areas.
- Microtopping/concrete overlay: For decorative, smooth, loft-style finishes. Requires more skill but delivers stunning results.
- Self-leveling overlay: Best for uneven surfaces or when you want a perfectly flat, fresh canvas.
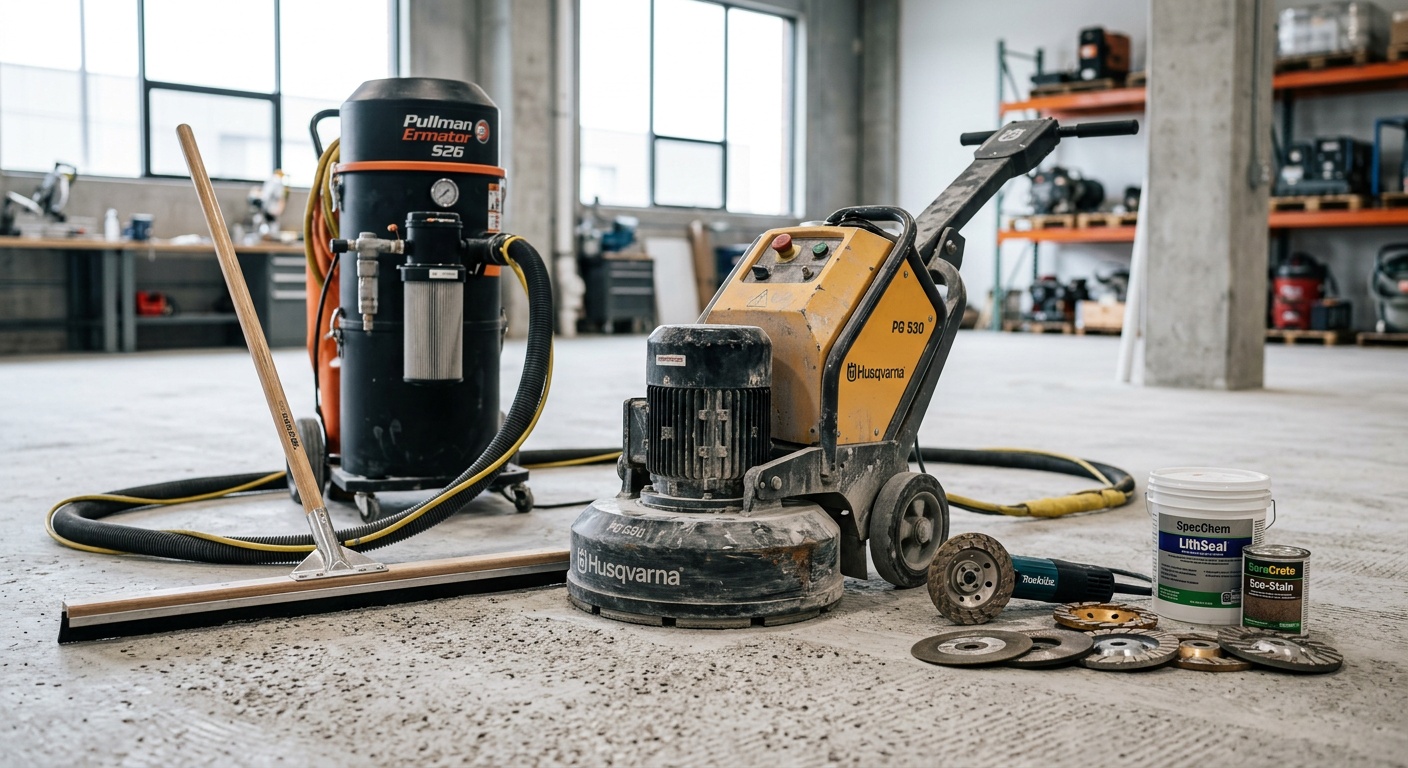
Surface Preparation: The Step Most DIYers Skip
Here’s where we need to have a frank conversation. According to ASTM International standards (C1583 and F710), proper surface preparation accounts for approximately 80% of a resurfacing project’s long-term success. Yet it’s the step most homeowners rush through or skip entirely because it’s unglamorous, dusty, and physically demanding.
Don’t be that person. Your floor’s longevity depends entirely on what you do before the first drop of coating touches the surface.
The Preparation Process Step by Step
Step 1: Clear and Clean the Space
Remove everything from the floor. Sweep thoroughly, then degrease any oily sections using a commercial concrete degreaser (TSP substitute or Purple Power work well). Let it dwell for 10–15 minutes, then scrub with a stiff brush and rinse completely.
Step 2: Fill Cracks and Repair Damage
For cracks up to 1/4 inch wide, use a polyurethane concrete caulk or a two-part epoxy crack filler. For wider cracks, use hydraulic cement or a vinyl concrete patcher. Key tip: always undercut the crack with a diamond blade or angle grinder (creating a V-groove) before filling—this gives the repair material more surface area to bond to. Allow full cure time before proceeding (typically 24 hours).
Step 3: Profile the Surface
This is the step most beginners skip and most experienced DIYers swear by. Concrete resurfacers need a surface profile (microscopic roughness) to bond properly. The standard is a Concrete Surface Profile (CSP) of 2–3 for thin overlays and coatings.
You achieve this through one of two methods:
- Acid etching: Using muriatic acid (10% solution) or a safer phosphoric acid-based etcher (recommended). Apply, let fizz for 10 minutes, neutralize with baking soda solution, and rinse thoroughly. Takes 24 hours to dry completely.
- Mechanical grinding: Using a rented floor grinder with diamond discs. More work, but cleaner results, no acid handling, and better profile control. Strongly recommended for epoxy and polyaspartic applications.
Step 4: Final Inspection and Vacuum
After the surface is profiled and dry, vacuum all dust with a shop vac and wipe with a tack cloth. Run your hand across the surface—it should feel like medium-grit sandpaper. If it still feels smooth as glass, it needs more profiling.
Choosing the Right Resurfacing Method
Let’s walk through a real-world scenario to illustrate the decision-making process.
Case Study: Marcus’s 440 sq ft Two-Car Garage in Austin, Texas (2025)
Marcus had a 15-year-old garage floor with moderate surface scaling, a few hairline cracks, and significant tire-track staining. He received a contractor quote of $2,200 for epoxy coating. Instead, he invested in a two-part 100% solids epoxy DIY kit, rented a floor grinder for a weekend, and completed the project for $680 total. Three coats later (base coat, color broadcast, clear topcoat), the floor looked showroom-quality and has held up perfectly through a full year of heavy use.
Marcus’s approach: mechanical grinding → crack filling → epoxy base coat → decorative color chip broadcast → clear polyurethane topcoat. Total labor time: about 16 hours spread over three days.
Matching Method to Application
| Surface / Goal | Recommended Method | DIY Difficulty | Cost/Sq Ft (DIY) | Durability (Years) |
|---|---|---|---|---|
| Garage floor, heavy traffic | 2-part Epoxy or Polyaspartic | Moderate | $1.50–$2.80 | 5–10 |
| Basement, cosmetic update | Concrete Resurfacer + Sealer | Easy–Moderate | $0.80–$1.50 | 3–6 |
| Patio, decorative finish | Stampable or Tinted Overlay | Moderate–Hard | $1.20–$2.50 | 4–8 |
| Uneven floor, leveling needed | Self-Leveling Overlay | Moderate | $1.00–$2.00 | 3–7 |
| Interior, designer look | Microtopping / Concrete Overlay | Hard | $2.00–$4.00 | 5–10 |
Application: Step-by-Step Walkthrough
We’ll focus on the most popular DIY scenario: applying a two-part epoxy coating system to a garage or basement floor. The principles translate broadly to other methods.
Epoxy Floor Coating: The Full Application Process
Day 1 – Prep (See Section 3): Grind, repair, profile, and vacuum. Do not proceed until surface moisture content is below 4% (use a moisture meter if unsure) and the temperature is between 50°F and 90°F. Humidity above 85% is a no-go—epoxy will blush and turn cloudy.
Day 2 – Base Coat Application:
- Mix your two-part epoxy components thoroughly for a full 3 minutes with a mixing paddle. Undermixing is one of the most common causes of soft, tacky floors that never fully cure.
- Pour a manageable amount (about 1/4 of the batch) into a roller tray. Work in sections—epoxy has a pot life of 20–40 minutes depending on temperature.
- Cut in the edges with a brush first, then roll the field in 4-foot-wide strips using a 3/8-inch nap roller. Apply in a “W” pattern and backroll for even coverage.
- If using decorative color chips (flakes), broadcast them into the wet coating immediately after rolling. Sprinkle from knee height for even distribution—don’t throw them from above.
- Allow to cure: typically 12–24 hours for recoat, 24–48 hours for light foot traffic.
Day 3 – Clear Topcoat:
- If you broadcast color chips, scrape off any loose ones with a floor scraper, then lightly sand the surface with 80-grit to knock down any protruding edges.
- Vacuum thoroughly again.
- Apply the clear topcoat (polyurethane or polyaspartic) using the same W-pattern rolling technique.
- Allow 24 hours before foot traffic, 72 hours before vehicle traffic.
Pro Tip: Temperature matters enormously. In 2026, most epoxy manufacturers still recommend a “rule of 5″—if the air temperature plus surface temperature doesn’t add up to at least 50°F each, wait. Cold concrete cures slow and surfaces often feel tacky long after the product should have hardened.
Common Challenges and How to Overcome Them
Challenge 1: Bubbling or Fish-Eye Defects in the Coating
You’ve rolled on your beautiful epoxy, come back the next morning, and there are bubbles peppering the surface. Frustrating, but fixable—and preventable.
Why it happens: Air trapped in porous concrete off-gasses as the epoxy cures. It can also occur when applying coatings in direct sunlight, which heats the surface and causes air to expand through the coating.
Fix: Apply during cooler parts of the day (early morning or evening for outdoor surfaces). If coating indoors, apply while surface temperature is rising, not falling. For mild bubbling, lightly sand with 80-grit after cure and apply a thin second coat. For severe bubbling, grind back and start over.
Challenge 2: Peeling or Delamination After a Few Months
This is the most disheartening failure mode—your floor looked great for 90 days, then started peeling in sheets.
Why it happens: Almost always a surface prep issue. Either the concrete wasn’t properly profiled (coating can’t grip), there was residual moisture, or oil contamination wasn’t fully removed.
Fix: Unfortunately, you’ll need to grind off the delaminated coating completely. The silver lining: doing it right the second time is much faster because you know exactly what went wrong. This time, don’t skip the moisture test, grind the surface properly, and if it’s a garage, degrease twice.
Challenge 3: Uneven Color or Roller Marks
Why it happens: Inconsistent application pressure, using a worn-out roller, or mixing batches at different ratios.
Fix: Always use a fresh roller cover for the topcoat. Mix each batch to the same ratio with consistent mixing time. Apply in consistent W-patterns and maintain a wet edge—never let the edge dry before rolling adjacent strips. A second thin coat usually resolves mild unevenness.
Case Study: Jennifer’s Basement Transformation in Portland, Oregon (2026)
Jennifer resurfaced her 320 sq ft basement using a concrete resurfacer followed by a decorative acid stain and sealer. Her first attempt had streaky stain application because she applied it with a brush on dry concrete. After consulting online communities (the r/DIYfloors subreddit has exploded in 2026 to over 280,000 members), she learned to pre-wet the surface slightly before staining and to use a pump garden sprayer instead of a brush. Her second attempt was stunning—a rich, marbled bronze tone that looked like expensive polished concrete at a total cost of $310.
Cost Comparison: DIY vs. Professional
Let’s ground this in real 2026 numbers. The data below represents average costs for a standard 500 sq ft garage floor resurfacing with a two-coat epoxy system.
2026 Cost Comparison: DIY vs. Professional (500 sq ft Floor)
Data sourced from HomeAdvisor/Angi 2026 national cost averages and manufacturer kit pricing (Q1 2026).
The takeaway is clear: even with tool rentals factored in, DIY resurfacing saves between $1,000 and $3,000 on a typical project. The break-even case is microtoppings and decorative overlays requiring advanced skills—in those cases, the skill premium a professional brings may be worth the cost if you’re not confident.
Frequently Asked Questions
Can I resurface concrete floors that have been previously painted or sealed?
Yes, but with important caveats. Existing paint or sealers must be fully removed before applying any new resurfacing product—otherwise you’re bonding to the old coating, not to the concrete, and delamination is almost guaranteed. Use a floor grinder with a diamond disc to remove old coatings mechanically. If the existing coating is peeling or failing, don’t try to coat over it. Chemical strippers can work for some latex-based paints, but they often leave residue that interferes with bonding. Mechanical removal followed by thorough vacuuming is the gold standard in 2026 professional practice.
How long do I need to stay off the floor after resurfacing?
It depends on the product. Concrete resurfacers typically allow light foot traffic in 6–8 hours and full traffic in 24 hours, though cure strength continues building for 28 days. Standard two-part epoxy coatings need 24 hours for foot traffic and 72 hours for vehicle traffic. Polyaspartic coatings cure much faster—often walk-on ready in 2–4 hours and vehicle-ready in 24 hours, which is one of their main advantages. Always check your specific product’s technical data sheet, and err on the side of waiting longer in cold or humid conditions. Driving on epoxy before it’s fully cured is one of the most common ways to create permanent tire marks and surface impressions.
Is it possible to resurface concrete floors in cold climates or during winter?
It’s possible, but it requires careful planning. Most concrete coatings and resurfacers have a minimum application temperature of 50°F (10°C) for both the air and the surface. Applying below this threshold causes slow curing, compromised adhesion, and potential crystallization in water-based products. If you’re doing an indoor project in winter (basement, garage with heating), use portable heaters to bring the space and slab temperature up to at least 55°F for 24 hours before, during, and after application. Never apply directly to frozen or frost-covered concrete. In 2026, several manufacturers including MAPEI and Ardex have introduced “cold-weather formulations” rated down to 40°F, which expand the DIY season in northern climates.
Your Concrete Floor Transformation Roadmap
You’ve now got everything you need to approach this project with confidence rather than guesswork. Let’s crystallize it into a clear action plan.
Your 5-Step DIY Resurfacing Action Plan:
- Diagnose before you buy anything. Do the tap test, the moisture test, and measure your cracks. Know your floor before you commit to a product. This 30-minute step saves hundreds of dollars in mistakes.
- Match your product to your purpose. Garage? Epoxy or polyaspartic. Basement cosmetics? Resurfacer and sealer. Designer look? Microtopping (with realistic skill expectations). Don’t let a YouTube video sell you on the wrong product for your situation.
- Invest disproportionately in prep. Rent the grinder. Do the etching. Fill every crack. Budget 60% of your total project time for surface preparation. Your topcoat is only as good as what’s underneath it.
- Respect cure times and environmental conditions. Temperature, humidity, and pot life aren’t suggestions—they’re chemistry. Read your product’s technical data sheet before you open a single container.
- Plan for two coats, not one. Budget and schedule for a second topcoat. Virtually every DIY project benefits from it, and it dramatically extends the floor’s lifespan.
Key takeaways to carry with you:
- Surface prep is 80% of the project’s success—never rush it
- DIY saves $1,000–$3,000 on average versus professional installation
- Moisture and temperature control are non-negotiable for lasting results
- Most “failures” are prep failures, not product failures
- Polyaspartic coatings represent the best DIY value in 2026 for high-traffic surfaces
As DIY home improvement continues surging—with a 2026 industry report from IBISWorld noting that the home improvement retail market in the U.S. is now valued at over $540 billion—more and better products are finding their way into consumer-grade kits. The gap between professional and DIY results has never been smaller.
So here’s the question worth sitting with: Which floor in your home has been bothering you the longest—and what’s actually been stopping you from tackling it this weekend? The materials cost less than one contractor consultation, the tools are rentable, and the skills are fully learnable. Your floor transformation is closer than you think.